“Easy Tips For Growing Stunning Zinnias In Your Garden”
Introduction
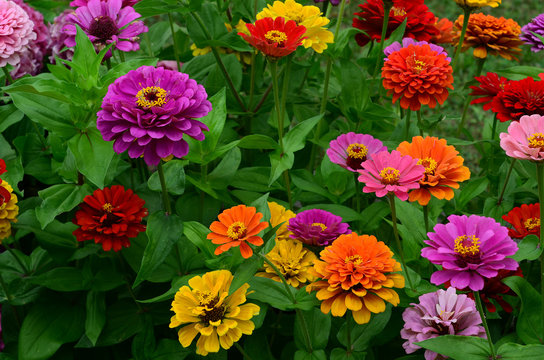
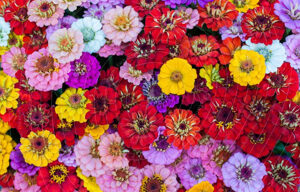
Zinnias offers a combination of easy care and show-stopping beauty. These blooms have become popular recently, and it’s easy to see why. Zinnias’ kaleidoscope of colors to long-lasting blooms is the ultimate garden multitasker.
What makes zinnias special is their beginner-friendly nature. Unlike many plants that demand precise conditions and expert care, zinnias are forgiving. They thrive with basic attention and reward you with months of continuous blooms.
Let’s embark on a journey through zinnia cultivation.
What Are Zinnias?
Zinnias belong to the Asteraceae family. Their history traces back to the wilds of Mexico. These flowers were considered so unattractive they were nicknamed “sick transit” (mal de ojos). Through cultivation over centuries, zinnias have transformed into stunning blooms.
A Rich Historical Legacy
The zinnia’s journey from wildflower to superstar is remarkable. It was named after German botanist Dr. Johann Gottfried Zinn. He first documented the flower in the 1750s. In the 1920s, they gained popularity. It was the introduction of the first dahlia-flowered zinnia, ‘Giant Dahlia’.
Types of Zinnias
Today there is a variety of zinnia types, offering unique characteristics and appeal:
Single-Flowered Zinnias
- Feature a single row of petals
- Resemble wild species
- Excellent for attracting pollinators
- Popular varieties include:
- ‘Persian Carpet’
- ‘Crystal Series’
- ‘Star Series’
Double-Flowered Zinnias
- Many layers of overlapping petals
- Create fuller, more dramatic blooms
- A preferred choice for cut flowers
- Notable varieties:
- ‘Benary’s Giant Series’
- ‘State Fair Mix’
- ‘Magellan Series’
Cactus-Flowered Zinnias
- Distinctive twisted, quilled petals
- Create unique textural interest
- Excellent for flower arrangements
- Standout varieties:
- ‘Burpeeana Giants’
- ‘Cactus Bright Jewels’
- ‘Giant Cactus Mix’
Growth Habits and Plant Architecture
Small Varieties (Under 12 inches)
- Compact Series:
- ‘Thumbelina’ (6-8 inches)
- ‘Peter Pan’ (10-12 inches)
- ‘Button Box’ (8-10 inches)
Best Uses:
- Container gardens
- Window boxes
- Front of borders
- Rock gardens
- Fairy gardens
Medium Varieties (12-24 inches)
- Intermediate Series:
- ‘Zahara’ (12-18 inches)
- ‘Profusion’ (14-16 inches)
- ‘Dreamland’ (18-24 inches)
Ideal Applications:
- Mixed borders
- Mass plantings
- Cutting gardens
- Container combinations
- Butterfly gardens
Tall Varieties (Over 24 inches)
- Giant Series:
- ‘California Giants’ (36-48 inches)
- ‘Queeny Lime’ (24-36 inches)
- ‘Giant Dahlia’ (30-40 inches)
Perfect For:
- Back of borders
- Cut flower production
- Screen plantings
- Statement specimens
- Professional growing
Growing Zinnias: Step-by-Step Guide
Starting Zinnia Seeds
Zinnia cultivation lies in proper seed starting.
Timing Your Planting
Indoor Starting Schedule:
- 4-6 weeks before last frost date
- Soil temperature: 70-75°F (21-24°C)
- Light requirements: 14-16 hours daily
- Hardening off period: 7-10 days
Direct Sowing Timeline:
- After soil reaches 70°F (21°C)
- Usually 2 weeks after the last frost
- When nighttime temperatures stay above 50°F (10°C)
- Many sowings every 2-3 weeks for continuous blooms

Seed Starting Methods
Indoor Sowing Technique:
- Use clean containers with drainage
- Fill with sterile seed starting mix
- Plant seeds 1/4 inch deep
- Space seeds 2 inches apart
- Maintain consistent moisture
- Provide bottom heat if possible
Direct Sowing Process:
- Prepare soil bed
- Remove weeds
- Loosen top 6 inches
- Add compost if needed
- Level surface
- Create planting rows
- Space rows 12-24 inches apart
- Make shallow furrows
- Mark rows
- Sow seeds
- Plant 1/4 inch deep
- Space 4-6 inches apart
- Cover with soil
- Water gently
Ideal Growing Conditions
Sunlight Requirements
Daily Needs:
- Full sun (6-8 hours minimum)
- Morning sun preferred
- Protection from strong afternoon sun in hot climates
- Even light distribution
Soil Preferences
Optimal Soil Characteristics:
- Well-draining
- Rich in organic matter
- pH range: 5.5-7.5
- Loamy texture
Soil Preparation Steps:
- Remove existing vegetation
- Add 2-3 inches of compost
- Till to 8-12 inches depth
- Test and adjust pH if needed
Regular Testing Schedule:
- Pre-planting soil analysis
- Mid-season nutrient check
- End-of-season evaluation
- pH monitoring monthly
Watering Protocol
Establishment Phase (First 2 weeks):
- Keep soil consistently moist
- Water when the top inch dries
- Avoid overhead watering
- Check drainage
Mature Plant Watering:
- 1 inch of water weekly
- Increase in high-heat
- Reduce in rainy periods
- Water at soil level
Soil Moisture Monitoring:
- Use moisture meter readings:
- 1-3: Time to water
- 4-7: Optimal range
- 8-10: Too wet
- Check soil 2-3 inches deep
- Check drainage patterns
- Observe plant responses
Advanced Irrigation Methods:
- Drip Systems
- Benefits:
- Water conservation (up to 50% reduction)
- Consistent moisture levels
- Reduced disease risk
- Automated scheduling
- Setup:
- Spacing: 12 inches between emitters
- Flow rate: 0.5-1 GPH per emitter
- Timing: Early morning operation
- Regular maintenance checks
- Benefits:
- Soaker Hoses
- Installation:
- Snake between plants
- Cover with mulch
- Connect to timer
- Check for clogs monthly
- Installation:
Plant Spacing Guidelines
By Plant Size:
- Dwarf varieties: 6-9 inches apart
- Medium varieties: 12-18 inches apart
- Tall varieties: 18-24 inches apart
Row Spacing:
- Single rows: 24-36 inches apart
- Double rows: 36-48 inches apart
- Mass plantings: 12-18 inches on center
Growing Zones
USDA Zones for Annual Growth:
- Best performance: Zones 3-10
- Extended season: Zones 8-10
- Short season: Zones 2-3
- Year-round possible: Zones 9-10
Care and Maintenance
Proper maintenance is important for healthy and abundant blooming during the season.
Fertilizing Strategies
Initial Feeding
At Planting Time:
- Light application of balanced fertilizer (5-5-5)
- 2-3 inches of compost worked into the soil
- Bone meal for root development
- Avoid high-nitrogen formulas
Ongoing Nutrition
Regular Feeding Schedule:
- Every 4-6 weeks during blooming
- Light applications preferred
- Stop feeding 6 weeks before frost
- Adjust based on soil tests
Recommended Fertilizers:
- Organic Options:
- Composted manure
- Fish emulsion (2-4-1)
- Seaweed extract
- Worm castings
- Synthetic Options:
- Balanced flower fertilizer (10-10-10)
- Bloom booster (3-15-15)
- Water-soluble plant food
- Slow-release granules
Growth Stage-Based Nutrition:
- Seedling Stage (Weeks 1-3):
- Light feeding (5-5-5)
- Focus on root development
- Foliar feeding optional
- Calcium supplementation
- Vegetative Growth (Weeks 4-6):
- Balanced feed (10-10-10)
- Micronutrient boost
- Increased nitrogen
- Trace mineral supplement
- Flowering Stage (Weeks 7+):
- Bloom booster (3-15-15)
- Weekly applications
- Reduced nitrogen
- Potassium emphasis
Seasonal Care Calendar
Spring Tasks:
- Soil preparation
- Initial planting
- Protection from late frost
- Early pest monitoring
Summer Care:
- Regular deadheading
- Consistent watering
- Fertilizer applications
- Disease monitoring
Fall Management:
- Reduced watering
- Final harvest
- Seed collection
- Plant removal
Winter Preparation:
- Clean bed thoroughly
- Remove all plant debris
- Add compost
- Plan for next season
Expert Mulching Strategies
Mulch Selection
Recommended Materials:
- Straw
- Shredded leaves
- Composted bark
- Pine needles
Benefits:
- Moisture retention
- Weed suppression
- Temperature regulation
- Soil structure improvement
Multi-Layer Mulching System
Layer Components:
- Bottom Layer:
- Compost: 1 inch
- Decomposed organic matter
- Nutrient-rich materials
- Moisture-retaining elements
- Middle Layer:
- Shredded leaves
- Straw or hay
- Pine needles
- Coco coir
- Top Layer:
- Decorative mulch
- UV-resistant materials
- Weed-suppressing options
- Aesthetic choices
Deadheading Techniques
Basic Deadheading
- Check plants twice weekly
- Remove blooms as they fade
- Morning deadheading preferred
- Final cleanup before evening
For Maximum Blooms:
- Cut stems long for arrangements
- Remove side buds for larger flowers
- Harvest in the morning hours
- Use clean, sharp tools
Pinching for Bushier Growth
Initial Pinching
Technique:
- Wait until plants reach 12-18 inches
- Remove top 2-4 inches
- Cut above a leaf node
- Maintain clean cuts
Benefits:
- Increased branching
- More flower production
- Stronger stems
- Compact growth habit
Common Zinnia Problems and Solutions
Understanding and preventing zinnia issues for maintaining healthy, productive plants:
Disease Management
Powdery Mildew Prevention and Treatment
Identification:
- A white powdery coating on leaves
- Initial symptoms on older foliage
- Reduced plant vigor
- Stunted flower production
Prevention Protocol:
- Cultural Controls:
- Plant spacing: 18-24 inches
- Morning watering only
- Adequate air circulation
- Resistant varieties selection
Treatment Options:
- Organic Solutions:
- Neem oil (1% solution)
- Potassium bicarbonate sprays
- Milk solution (1:10 ratio)
- Sulfur-based fungicides
- Chemical Controls:
- Chlorothalonil
- Propiconazole
- Myclobutanil
- Application every 7-14 days
Bacterial and Fungal Leaf Spots
Identification and Diagnosis:
- Bacterial Spots:
- Water-soaked lesions
- Yellow halos
- Angular spots
- Rapid spread in wet conditions
- Fungal Spots:
- Circular brown spots
- Dark borders
- Center may fall out
- Progressive leaf yellowing
Management Strategy:
- Prevention:
- Clean seed sources
- Crop rotation
- Good sanitation
- Resistant cultivars
- Cultural Controls:
- Remove infected material
- Improve air circulation
- Avoid overhead watering
- Clean garden tools
- Treatment Protocol:
- Copper-based sprays
- Botanical fungicides
- Systemic fungicides
- Protective barriers
Root Rot Management
Early Detection Signs:
- Wilting despite moisture
- Yellowing lower leaves
- Stunted growth
- Root discoloration
Prevention Methods:
- Soil Management:
- Well-draining soil mix
- Raised beds in clay soil
- Proper plant spacing
- Avoid overwatering
Pest Management
Japanese Beetle Control
Monitoring and Detection:
- Daily inspection
- Trap placement
- Damage assessment
- Population tracking
Control Methods:
- Physical Control:
- Hand-picking
- Row covers
- Trap crops
- Barrier methods
- Biological Control:
- Beneficial nematodes
- Milky spore
- Parasitic wasps
- Natural predators
- Chemical Options:
- Pyrethrin-based sprays
- Neem oil applications
- Systemic insecticides
- Targeted treatments
Aphid Management
Identification:
- Clusters on new growth
- Sticky honeydew presence
- Leaf distortion
- Color variations (green, black, pink)
Control Strategy:
- Natural Controls:
- Ladybugs
- Lacewings
- Parasitic wasps
- Praying mantids
- Organic Solutions:
- Insecticidal soaps
- Essential oil sprays
- Garlic-pepper spray
- Strong water spray
- Chemical Controls:
- Selective insecticides
- Systemic treatments
- Growth regulators
- Contact sprays
Spider Mite Control
Early Detection:
- Fine webbing
- Stippled leaves
- Bronzing foliage
- Reduced vigor
Management Plan:
- Treatment Options:
- Miticides
- Horticultural oils
- Sulfur dusts
- Predatory mites
Harvesting and Using Zinnias
Harvesting and utilizing zinnias can maximize garden beauty and cut flower longevity.
Optimal Timing
Best Harvesting Conditions:
- Early morning (5-9 AM)
- Late evening (after 6 PM)
- Cool temperatures
- Before full-bloom stage
Seed Saving Protocols
Collection Timing
Optimal Collection Period:
- Flowers completely dried
- Seeds are dark and firm
- Heads brown and crisp
- Before autumn rains
Collection Process:
- Selection Criteria:
- Choose best performers
- Mark plants early
- Note desirable traits
- Label varieties clearly
- Harvesting Steps:
- Cut the entire seed head
- Place in paper bags
- Store in a dry location
- Process within week
Seed Processing
Cleaning Methods:
- Dry Processing:
- Break apart heads
- Screen sifting
- Winnowing chaff
- Final cleaning
- Storage Preparation:
- Moisture testing
- Drying if needed
- Removing debris
- Size grading
Advanced Growing Tips
Creating Professional Cutting Gardens
Layout Planning:
- Bed Design:
- Width: 3-4 feet
- Length: As needed
- Paths: 24-36 inches
- Access: Both sides
- Spacing Guidelines:
- Tall varieties: 12-18 inches
- Medium heights: 9-12 inches
- Dwarf types: 6-9 inches
- Row spacing: 24-36 inches
Color Combination Strategies
Season-Long Display Planning
Color Timeline:
- Early Season:
- Pastels
- Bright whites
- Soft yellows
- Light pinks
- Mid-Season:
- Bold colors
- Deep purples
- Rich reds
- Vibrant orange
- Late Season:
- Jewel tones
- Bronze shades
- Deep burgundy
- Rich coral
Frequently Asked Questions: Complete Zinnia Care Guide
Pest and Disease Management
“What are common zinnia problems?”
Common Pests:
- Insect Issues:
- Japanese beetles
- Aphids
- Spider mites
- Caterpillars
- Prevention Methods:
- Regular inspection
- Companion planting
- Natural predators
- Good air circulation
Disease Concerns:
- Fungal Problems:
- Powdery mildew
- Bacterial leaf spot
- Alternaria blight
- Stem rot
- Prevention Strategies:
- Morning watering
- Proper spacing
- Resistant varieties
- Clean garden practices
Seasonal Care
“When should I plant and maintain zinnias?”
Planting Timeline:
- Spring Planning:
- After the last frost
- Soil temperature 70°F
- Succession planting
- Indoor starting option
- Summer Care:
- Regular deadheading
- Moisture monitoring
- Fertilizer schedule
- Pest watching
- Fall Management:
- Seed collection
- Final blooms
- Cleanup timing
- Soil preparation
Conclusion:
Essential Zinnia Success Tips
Key Takeaways:
- Location Fundamentals:
- Full sun is crucial
- Good air circulation
- Protected from strong winds
- Proper spacing matters
- Care Basics:
- Consistent moisture
- Regular feeding
- Proactive maintenance
- Seasonal attention
- Common Mistakes to Avoid:
- Overcrowding plants
- Overhead watering
- Neglecting deadheading
- Poor air circulation